• Company
    • About Us
    • Case Studies
    • Press Center
    • Events
    • Careers
    • Blog
    • Contact us
  • Contact us
  • Login
 
  • English
    • Deutsch
    • Español
    • Français
    • Italiano
    • Português
Paessler
                    - The Monitoring Experts
  • Products
    • Paessler PRTG
      Paessler PRTGMonitor your whole IT infrastructure
      • PRTG Network Monitor
      • PRTG Enterprise Monitor
      • PRTG Hosted Monitor
      • PRTG extensionsExtensions for Paessler PRTGExtend your monitoring to a new level
    • Icon Features
      FeaturesExplore all monitoring features
      • Maps & dashboards
      • Alerts & notifications
      • Multiple user interfaces
      • Distributed monitoring
      • Customizable reporting
  • Solutions
    • Industries
      IndustriesMonitor various industry sectors
      • Industrial
      • Healthcare
      • Data Center
      • Education
      • Finance
      • Government
    • IT Topics
      IT TopicsMonitor all areas of IT
      • Network Monitoring
      • Bandwidth Monitoring
      • SNMP Monitor
      • Network Mapping
      • WiFi Monitoring
      • Server Monitoring
  • Pricing
  • Resources
    • Getting Started
      Getting StartedModules for self-paced learning
    • How-to Guides
      How-to GuidesGet the most out of PRTG
    • Videos & Webinars
      Videos & WebinarsLearn from Paessler experts
    • IT  Knowledge
      IT KnowledgeExpand your IT knowledge
    • PRTG Manual
      PRTG ManualFull documentation
    • Knowledge Base
      Knowledge BaseShare community knowledge
    • PRTG Sensor Hub
      PRTG Sensor HubGet sensors, scripts & templates
    • Trainings
      PRTG TrainingLearn how to work with PRTG
  • Partners
    • icon star
      New Partners and MSPBecome a new partner or MSP
    • icon partner
      Partner PortalLog in to your partner account
    • Deal Registration
      Deal RegistrationRegister your sales opportunities
    • icon search
      Find a PartnerFind partners selling Paessler products
    • icon technology
      Technology AlliancesSee Paessler technology partnerships
  • Company
    • About Us
    • Case Studies
    • Press Center
    • Events
    • Careers
    • Blog
    • Contact us
  • Contact us
  • Login
  • English
    • Deutsch
    • Español
    • Français
    • Italiano
    • Português
  • Get a quote
  • Free trial
  1. Home>
  2. Resources>
  3. How-to Guides>
  4. How to use your own SSL certificate with the PRTG web server
PRTG Logo

How to use your own SSL certificate with the PRTG web server

Free download
product overview

Using SSL certificates in PRTG: Step-by-Step Guide

Table of content
  • What is an SSL certificate?
  • Certificate files for PRTG
  • Automatic import of certificates
  • Run the report
  • Troubleshooting

Bring your monitoring experience to the next level with PRTG

Get full visibility with real-time dashboards, alerts, and customizable sensors

Free download
PRODUCT OVERVIEW

What is an SSL certificate?

PRTG supports connections to the PRTG web server via SSL/TLS to secure all data that you enter in the various PRTG user interfaces.

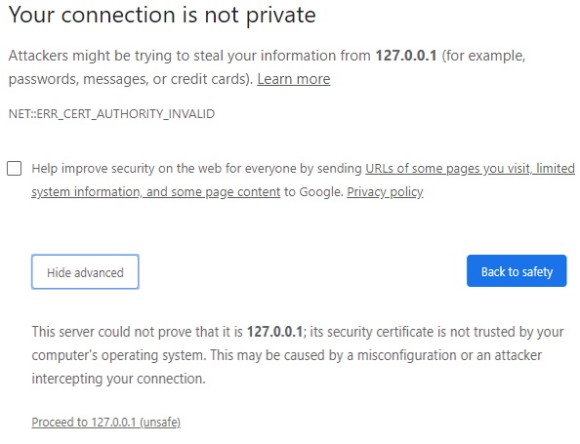
PRTG comes with an SSL certificate that you can use to secure your connections to the PRTG web server and access the PRTG web interface via HTTPS. Because the SSL certificate is a self-signed certificate, browsers show an SSL certificate warning when you try to open the PRTG web interface. This does not mean, however, that your connection is not secure. It just means that the certificate does not match the DNS name or IP address of your PRTG core server.

To remove the certificate warning in the browser, you can provide a trusted SSL certificate that matches the DNS name or IP address of your PRTG core server. The certificate must be signed by a valid certificate authority (CA), for example, DigiCert, GoDaddy, or InstantSSL.

PRTG Screenshot connection not private window

Certificate files for PRTG

PRTG needs three different certificate files that must be correctly named and that must be available in PEM-encoded format.

  • crt: This file is the certificate for the PRTG core server.
  • key: This is the private key that matches the certificate for the PRTG core server. Make sure that you provide the private key without encryption.
    To check that the file is not encrypted, open it in a text editor and search for the string ENCRYPTED. If the file contains this string, decrypt the file with an SSL tool, for example OpenSSL, and the key password.
  • pem: This file is the public root certificate of the certificate issuer. It must contain all your issuer’s required root certificates in one file. If there is more than one root certificate in .pem format, copy all files together in a single file. The order does not matter in this case.
PRTG Screenshot Folder

Automatic import of certificates

We recommend that you use the free tool PRTG Certificate Importer that you can download from our website. There, you also find step-by-step instructions on how to use the tool.

PRTG Certificate Importer does the following:

  • It automatically decrypts the file with the private key in case the file is encrypted.
  • It makes a backup of the default SSL certificates for PRTG and automatically creates and converts all certificate files that you need for PRTG out of the files that you get from the CA.
  • It automatically stops and starts the PRTG core server service and saves all necessary certificate files in the correct subfolder on the PRTG core server system.
PRTG Screenshot Certificate Importer

PRTG makes monitoring as easy as it gets

Custom alerts and data visualization let you quickly identify and prevent all kinds of issues

Free download
PRODUCT OVERVIEW

Manual import of certificates

You can always import your certificate files manually, although we recommend that you use PRTG Certificate Importer.

  1. Make sure that you have backups of the default SSL certificates files that come with PRTG.
  2. In many cases, the CA provides you with a single file that contains several certificates and the respective private key. The file might end in *.chain.pem or similar.
  3. Open the file in a text editor.
  4. Copy one certificate into a new text file and save the file under the name crt. If there are several certificates, select the first certificate. 

    A certificate begins with
-----BEGIN CERTIFICATE-----

and ends with

-----END CERTIFICATE-----

5. Copy the private key into a new text file and save the file under the name key.

A private key begins with

-----BEGIN RSA PRIVATE KEY-----

and ends with

-----END RSA PRIVATE KEY-----

Important: Make sure that you provide the private key without encryption. To decrypt the private key, take the following steps:

  • Download an SSL converter tool, for example, OpenSSL.
  • In the command line, run openssl rsa -in [encrypted-key].key -out prtg.key
  • When the tool asks you to enter the PEM pass phrase, enter the password for the private key.

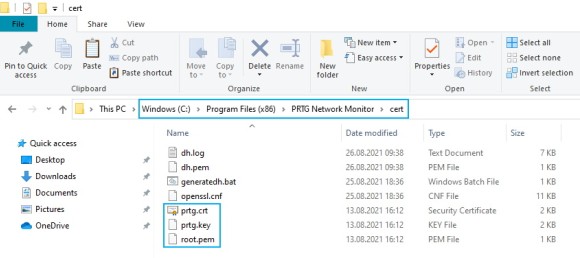
6. Find the certificate issuer’s root certificate. In most cases, this is the last certificate listed before the private key. Copy the root certificate into a new text file and save the file under the name root.pem.

7. Stop the PRTG core server service via the PRTG Administration Tool.

8. Copy the three files into the \cert subfolder of the PRTG program directory.

9. Restart the PRTG core server service via the PRTG Administration Tool.

Note: If you use remote probes, make sure that you copy the same certificate files to the \cert subfolder of the PRTG program directory on the remote probe system.

PRTG Screenshot Administration Tool

Troubleshooting

If PRTG does not start after you manually imported your own certificates, check if you can answer the following questions with Yes:

  • Did you name all certificate files correctly?
  • Are all certificate files in PEM-encoded format? Also check that the PEM-encoded files do not contain Unix line breaks because only Windows line breaks are supported.
  • Did you decrypt the private key?

If answering these questions does not solve the issue, the fastest way to get PRTG up and running again is to copy the three default certificate files for PRTG back to the \cert subfolder of the PRTG program directory.

If you have no backup of the three default certificate files, delete the \cert subfolder completely and install PRTG over the existing installation.

This how-to guide only scratches the surface?

Get more deep-dive information here!

Preview blog

Blog: Monitoring certificates and availability of devices 

Read more
Preview Manual

Manual: Install the PRTG SSL Certificate Sensor

READ more
PRTG Logo

Start monitoring your IT infrastructure for free with PRTG and see how it can make your network more reliable and your job easier.

Free download
PRODUCT OVERVIEW

Products

  • Paessler PRTG
    Paessler PRTGMonitor your whole IT infrastructure
    • PRTG Network Monitor
    • PRTG Enterprise Monitor
    • PRTG Hosted Monitor
    • PRTG extensions
      Extensions for Paessler PRTGExtend your monitoring to a new level
  • Icon Features
    FeaturesExplore all monitoring features

Monitoring with PRTG

  • Network monitoring
  • Bandwidth monitoring
  • SNMP monitoring
  • Network mapping
  • Wi-Fi monitoring
  • Server monitoring
  • Network traffic analyzer
  • NetFlow monitoring
  • Syslog server

Useful Links

  • PRTG Manual
  • Knowledge Base
  • Customer Success Stories
  • About Paessler
  • Subscribe to newsletter
  • PRTG Support
  • PRTG Consulting
  • PRTG Feedback & Roadmap

Contact

Paessler GmbH
Thurn-und-Taxis-Str. 14, 
90411 Nuremberg 
Germany

[email protected]

+49 911 93775-0

  • Contact us
©2025 Paessler GmbHTerms & ConditionsPrivacy PolicyImprintReport VulnerabilityDownload & InstallSitemap
Application Performance Monitoring Tool Application Performance Monitoring Tool Application Performance Monitoring Tool