- English
- Deutsch
- Español
- Français
- Italiano
- Português
Adding sensors to your devices is a great way to visualize the health and performance of your environment. However, this is not very proactive. Wouldn’t it be great if PRTG could tell you when things are about to go wrong with a device, application, or service? That’s exactly what limits do!
Channel limits enable you to set threshold values for almost any data that PRTG collects and then trigger notifications if the given threshold values are exceeded or undercut. This way, PRTG always alerts you to an impending problem in time.
The available sensor channel settings are nearly the same for all sensor types. An exception is the Downtime channel, which is automatically calculated and does not offer settings for limits. Custom sensor channels have a Value Lookups and Limits setting to distinguish between alerting by lookups or limits.
Custom alerts and data visualization let you quickly identify and prevent all kinds of issues
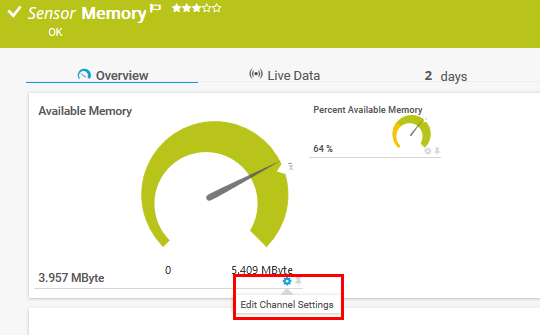
Select the sensor that you want to add limits for. Our example shows an SNMP Memory.
Click the gear icon below the channel gauge to edit the channel’s settings.
In the channel settings, select Enable alerting based on limits under Limits.

Enter the desired limits. The sensor will enter a Warning or Down status when these limits are undercut or overrun. For example:

You can optionally add messages to the sensor message if the Warning or Error limits are exceeded or undercut. Click Apply to save your settings.

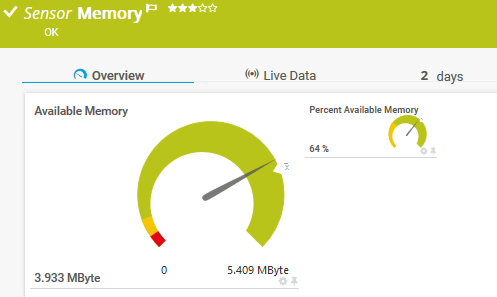
Now, the various colors displayed in the channel gauge represent the limits we have created.
Get full visibility with real-time dashboards, alerts, and customizable sensors
The steps for setting limits for a custom channel are pretty much the same as setting limits for non-custom channels. But there are some differences in the settings as such.
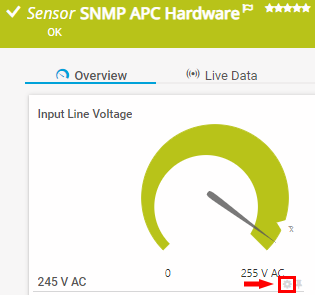
Select the custom sensor that you want to add limits for.
Click the gear icon of a channel gauge to edit the channel’s settings.
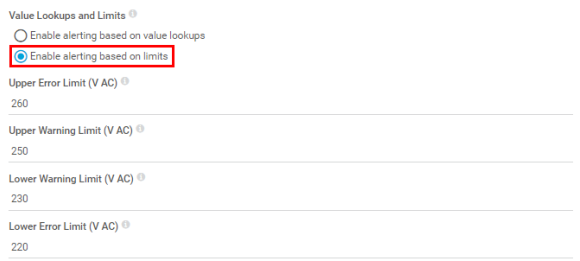
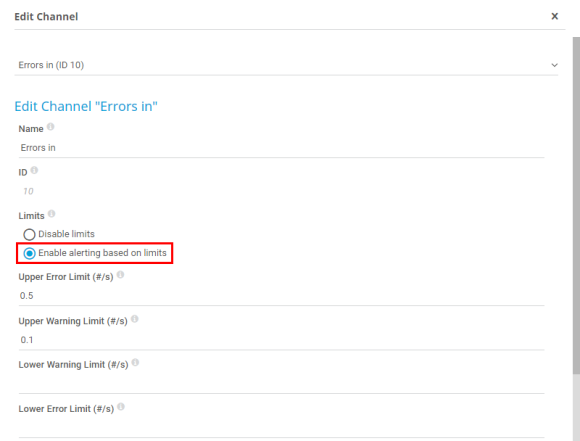
In the channel settings, go to Value Lookups and Limits to define when the channel will show a Warning or Down. Select Enable alerting based on limits. to save your settings.

Next, enter values for any or all of the available limit fields:
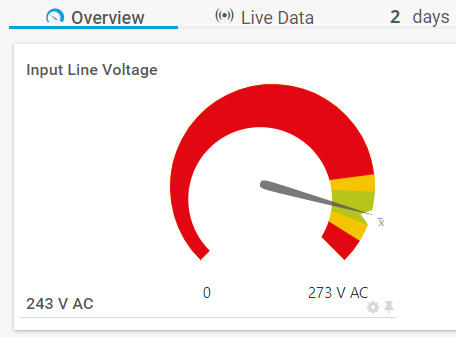
This means you will be notified if the incoming line voltage goes above, or below, our acceptable range (231 – 249 volts).
NOTE: These settings are just examples, please check with your device OEM and/or your IT Department before setting limits on power supply equipment.
Finally, you can optionally define status messages that are additionally displayed
in the sensor message when the Warning or Error limits are exceeded/undercut.

Now, the various colors displayed in the channel gauge represent the limits we have created.
Custom alerts and data visualization let you quickly identify and prevent all kinds of issues
You can set specific limits for all sensor channels of the same type that are common to all selected sensors of the same type. For our example, we choose SNMP Memory sensors again.
From the main menu bar, select Sensors | By Type | SNMP Memory.
Select all Edit buttons of all sensors that you want to set limits for.
Then click the wrench symbol in the blue box on the right side.

Now click Channel Settings to get a list of all available channels you can edit.
Select a channel that you want to set limits for. Limits can only be set for channels that allow limits.
Choose for example the channel Percent Available Memory.

Mark the checkbox Limits and click Enable alerting based on limits. Enter threshold values for limits that you want to set.
Optionally, you can enter an Error Limit Message or a Warning Limit Message.
Click OK to save all settings for all Percent Available Memory channels in all previously selected sensors.

For channels that measure absolute values (like our SNMP Memory sensor in the example above), limits are also set using absolute values.
You can also set limits for channels that measure delta (x.xx/sec) values. The SNMP Traffic sensor for example reports errors within a certain scanning interval.
This example shows how to configure the limits for delta channels:
One of the most common reasons for monitoring projects failing is that limits are created straight away. We recommend that you add devices and sensors to PRTG and then leave it alone; ideally for a week or two, to collect baseline data. You can then use this data to judge what is “normal” activity for your devices and then set the limits accordingly.
Busy service desk teams very quickly learn to ignore floods of alerts from badly tuned monitoring systems. This inevitably leads to important notifications being missed. Only after you’ve collected baseline data and set your limits accordingly, should you enable notifications, and even then, do it gradually, with a small number of test recipients.
There is no point in adding limits to sensors that don’t add “business value”. Doing so just clutters up your monitoring system and adds to the workload of the people receiving the alerts.


